JTX1000

Honda B20A Valve Clearance Adjustment

Hi All,

If you hear some knocking from valve cover, 
most probably the valve clearance needs re-adjustment as the gap is increase due to wear and tear.
Using good lubricant oil will prevent the gap from increasing.
In Malaysia, i recommend JTX1000 as it has EP/AW Extreme Pressure / Anti-Wear.
JTX1000 really can save a lot of money due to engine protection and less maintenance.
Buy JTX1000 before you buy new vehicle.

Feeler gauge brand King Toyo model KT-FG25M.
For easier process, take out the necessary blade.
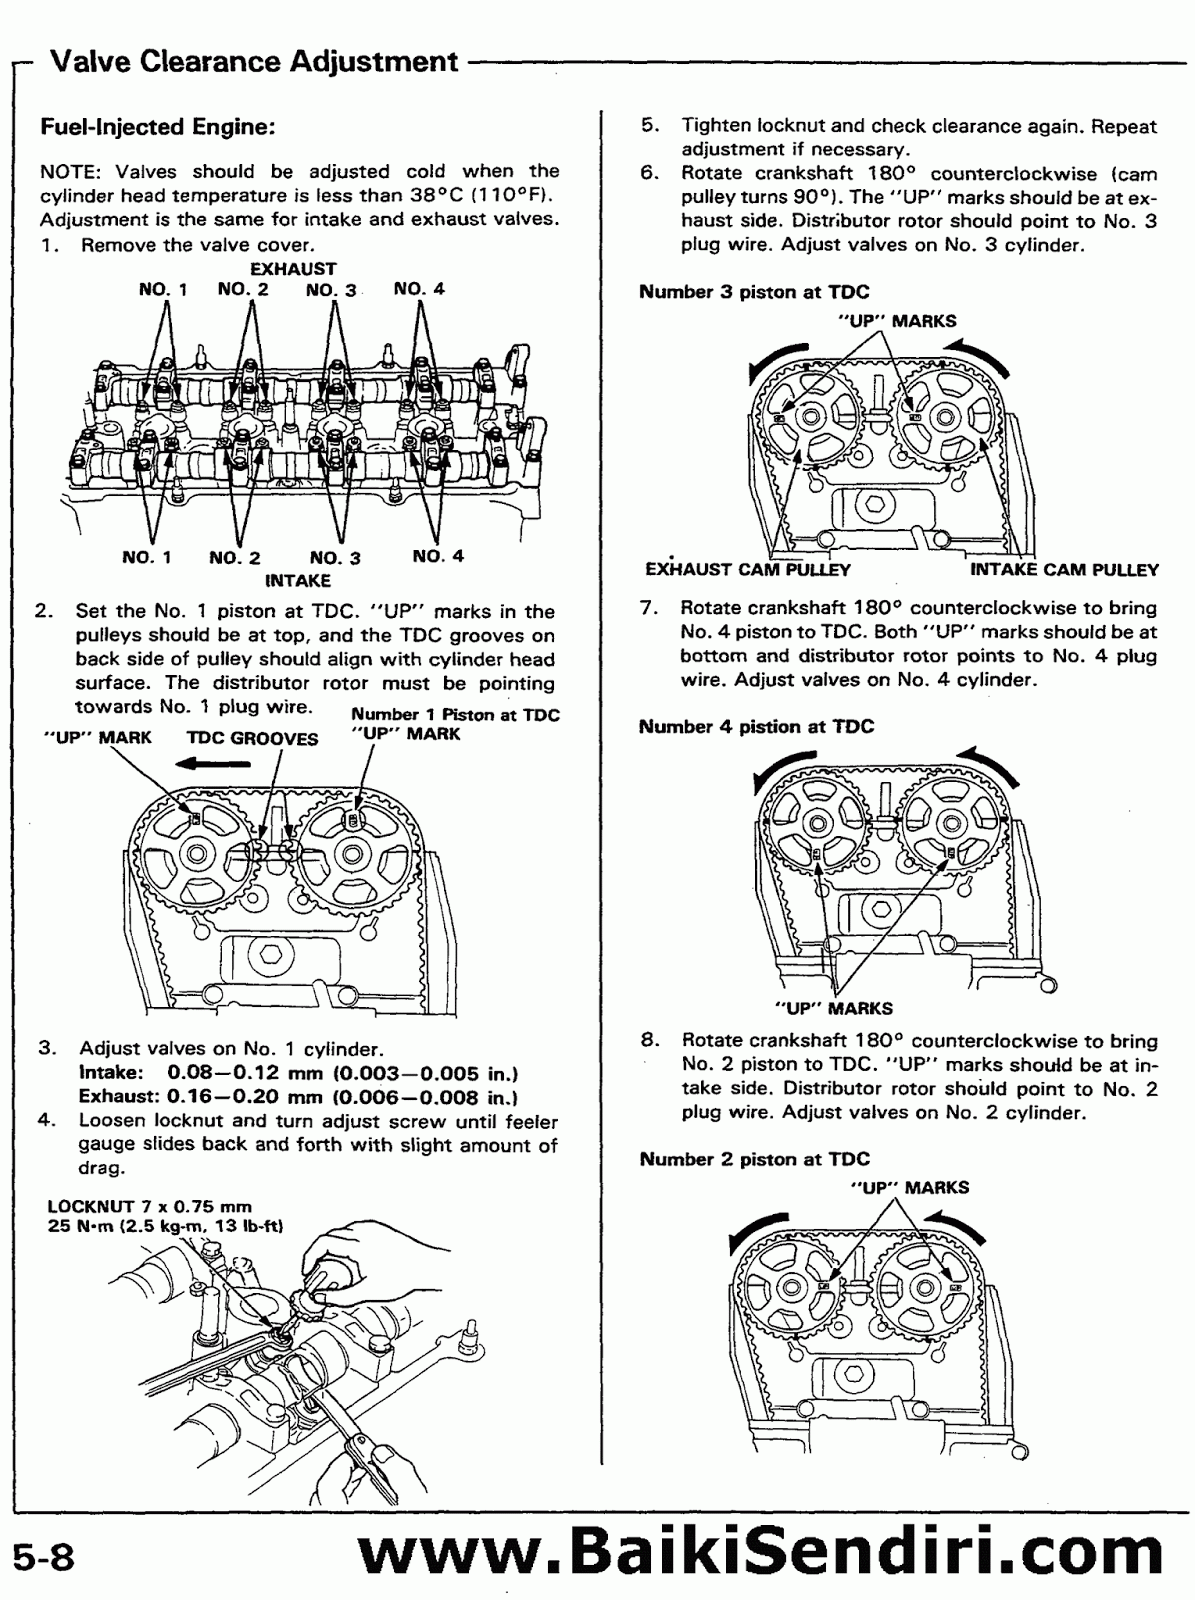
For this B20A Honda Engine, you can refer to photo.
0.08-0.09 for intake
0.16 (0.10+0.06)-0.17(0.10+0.07) for exhaust.
For exhaust, the feeler gauge doesn't have the 0.16-0.17.
So i add up 2 blades to make gauge blade.

Remove the necessary and valve cover.

I recommend the timing belt shall be cover with paper or any clean material.
Protect it from any oil.

Reference.

Turn steering to the left.
Use socket bolt sized 17 to turn the crankshaft.
Turn Anti-Clockwise to get the each cylinder on top position.
No ClockWise Turn as it will stretch the timing belt.

Some short note for guide.
Avoid any mistake and finest adjustment.

I used ratchet to loosen as old sludge jammed the thread.

Easy to adjust compared to H22A.
H22A needs some special tool.
Loosen the nut and adjust the center screw.

For this example(intake valve), adjust until the 0.08 feeler gauge blade can slightly move in and out.
Make sure 0.09 is unable to move in between.

You have total 16 valves clearance to adjust.
Slow and accurate will be worth it.

Good Luck!

Some videos.. before and after adjustment...


Honda Prelude Thermostat Replacement

Hi All DIYers...
Luckily the thermostat is suspected stucked closed.
That leads to this DIY creation to help others.

When the temperature is over half of the gauge, the fan will not turned ON.
To test the fan and switch, you can refer to the past DIY 

The lower hose or lower radiator cover is COLD enough to touch while the upper hose is HOT.
The temperature keep rising and you can hear weird hot water sound.

This is where the thermostat LIVE.
Need to loose only 2 BOLT sized 10. Easy enough.

Gently pull thermostat out by using flat screwdriver.


Never use tap water. The corrosion is minimal.

To confirm the thermostat is faulty, boil it in a water.
In this photo, it will never open.

19301-P08-316 Honda Thermostat.
Comparable with local one.

On the left is new Honda genuine thermostat.
While on the right is local one.
The local looks similar with genuine except the middle rubber valve.
FYI the local failed after 2 years or 30000.
Maybe the different material.

Softer springs.

A bit harder springs for local.

New? 
Test/boil it out before put it back into thermostat housing.

Open when Hot!

Close when Cold!

Clean the housing before put it back.
Follow marking on top or it will not fit.

Put some thin silicone gasket (optional but recommended).

Tighten the bolts.

Wipe off the excessive silicone gasket.

Reference. Click for bigger view.

Good Luck!

Replace Honda Radiator Fan Switch

Hi All DIYERs...

This time i want to share some easy DIY.
Replacing radiator fan switch.
The switch is automatically short circuited if radiator water reach 90 degree.

Common Wrench sized 22 and radiator fan switch.

To make sure the cooling circuit is working, short the connector with wire and turn the key to ON.
Same method used for emergency or temporary solution for overheating.

Loosening the switch.

Wrap with thin PTFE white tape.
For Reference.


Also take this opportunity to flush the cooling system.

Good LUCK!