JTX1000

Honda Prelude BA5 Front Lower Arm Bush and Anti Roll Bar Bush

Put stands and you are ready to work under the car.

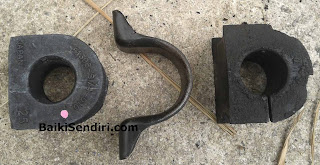
This anti roll bar bush needs to be replace due to age and wear.

Loosen out 2 bolt sized 14.

Any way you can do as long the bush and long bolt is gone.
Grind them if the long bolt is stubborn.
Finally end up with cutting with grinder.

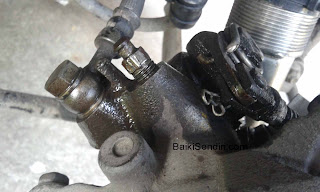
Use ball joint remover to remove lower arm.

Closer photo.

May this reference guide Prelude owner to find bush.
For trailing bush, the shop suggest me the Mitsubishi Pajero V6.
It looks similar.


Mitsubishi Pajero V6 vs Honda Prelude BA5.

Honda Prelude BA5 vs Mitsubishi Pajero V6.

Mitsubishi Pajero V6 bush used in Honda Prelude BA5.

Anti Roll bar bush.
Similar to Honda Accord SM4 25mm.

Easy enough for beginner.

Put some rubber grease.

New anti roll bar end bush.
This is how they are arranged.

Everything new for lower arm components.

Next time upper arm bush. Shall be easier take less time.

Happy DIY!!!

Connector Repair or Recondition

Old car wire sometimes become hard and fragile.
This time I'd like to show some way to repair them.
First, cut wire from connector and leave some wire core to be soldered later.

Stand like these helpful for solder process.
Align the wire and put some solder paste.

It just like cooking with help from solder paste.
The solder will weld the wire core.
Try to make it shortest possible as this part will be hardened.
So, there is some flexibility issue.

Finish it with wire shrink.

This tutorial become useful when the connector is hard to find.
Be careful with this solution as the solder part will become hardened and may not suitable for component that needs flexibility of wire.

Honda Prelude BA5 Rear Brake Disk Full Service


Release hand brake and disassemble the brake cable.

Add some anti rust to make the job easier.
Pull out the lock pin.

Use flat screwdriver to remove the pin.


Use brake hose clamp to prevent brake oil drain.
Spray anti rust and use impact driver to loosen the screw.
Normal screwdriver also can work if the they are not too tight.


Loosen the caliper bolts.

Loosen the bracket bolts.

Use 2 bolts sized 12 to pull out the disk.

OEM Honda Brake Pad. 43022-SR3-003

Installation Procedure.

One of the piston need to be replaced.
This is branded new.  43215-SF1-003 .
I bring the sample and the shop gave me this.
If both pistons are broken, please consider to buy used caliper if available.

Brake Caliper service kit.
They matched Honda Accord SM4 also.

01473-SM4-010       01473-sf1-010


Inside the piston.


Use this tool if you want to disassemble the piston.
This step is unnecessary. 

Assembled!

Snap Ring Plier.

Useful tool. Also can use to rotate the piston.


It is better to have long nose snap ring plier.


Refer to last picture for component diagram.

After cleaning, put new grease to the hand brake cam hole.

Put new seal.

Put the hand brake cam.

Put new O-ring to the sleeve piston.
Add some grease to the rod to be attached to the piston.
There are 2 holes at the bottom of caliper.
Match them and push the piston.

Put snap ring to lock the piston.

Put new piston seal and piston boot.

Rotate ClockWise the piston until the piston is not going to any deeper.
DONT COUNTER CLOCK WISE
The piston must be positioned as in the picture to fit the brake pad.
The slider pin boot also included in the service kit.
All are ready.
The quickest step is to install everything back to its original position.

One person bleeding method.
Adjust the hand brake if necessary.

Reference.

This DIY is for those have experience at least front brake service job.
You might face difference techniques and method in actual implementation.