Note: I copied this from Prelude Forum...
If your car has the following symptoms, this procedure will help
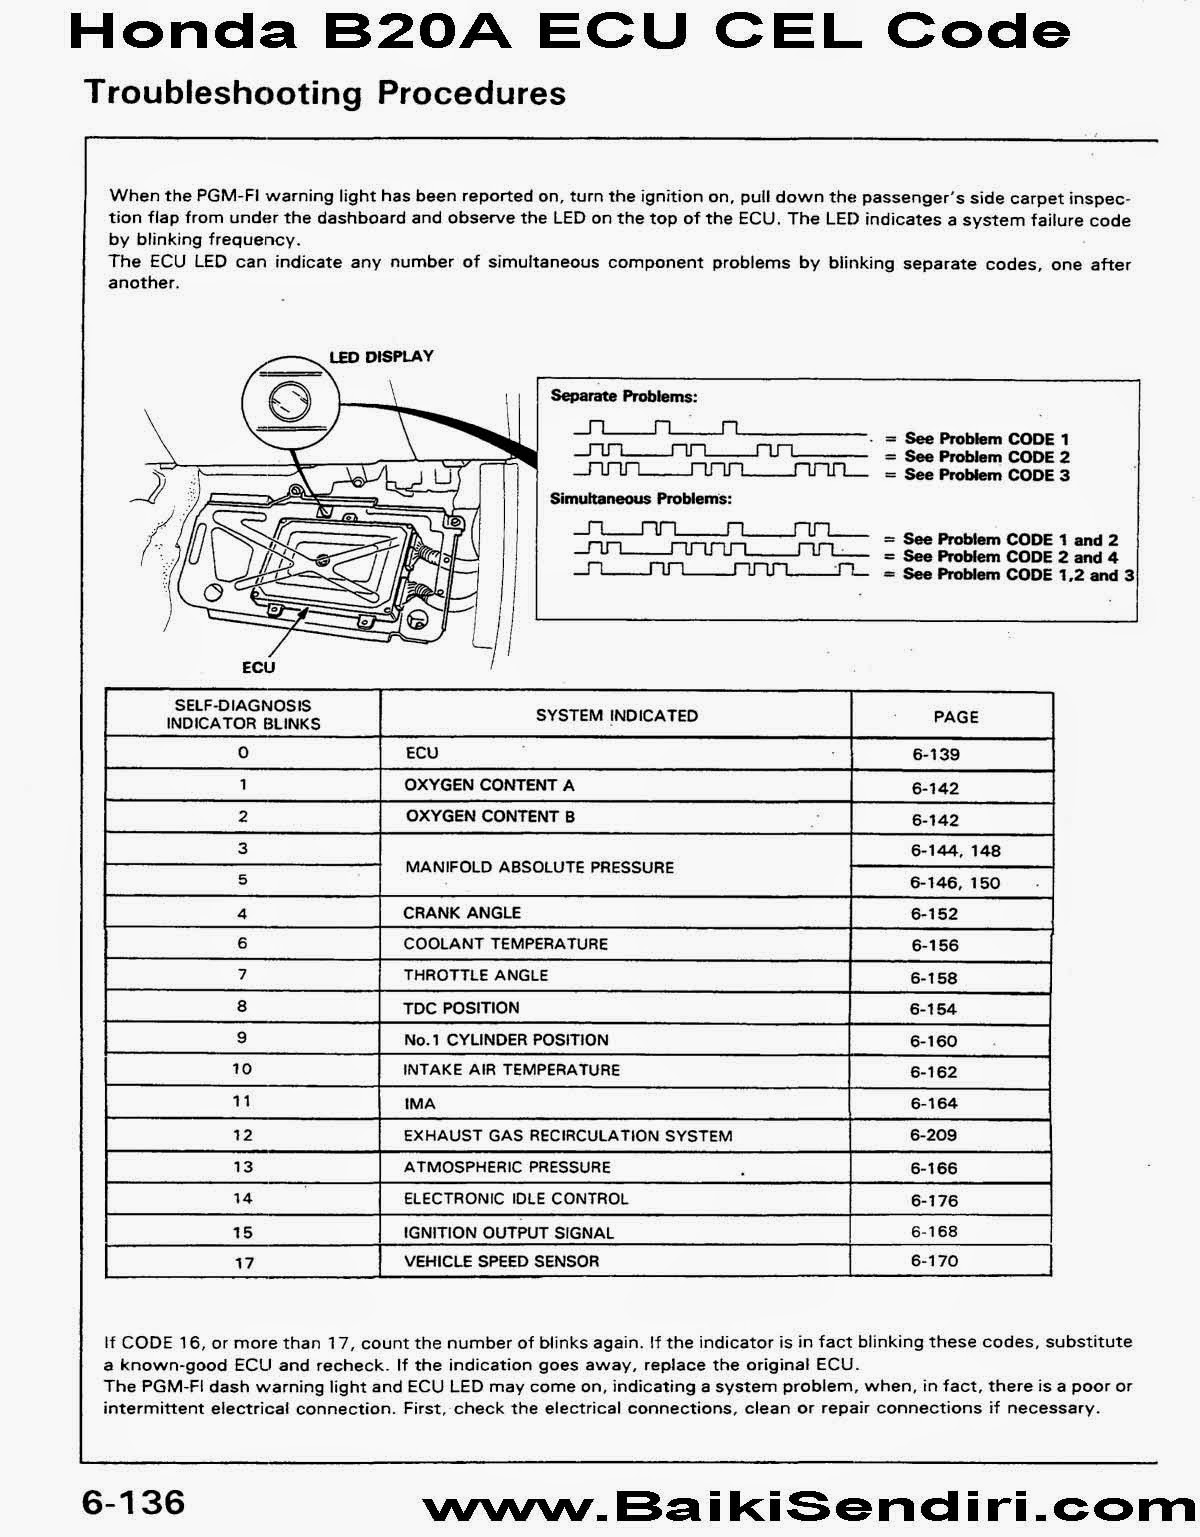
a) S4 indicator flashing
b) A/T code of 2 or 8
c) stuck with one gear (usually at higher gear)
d) hard to shift between gear, etc.
In my case, my car has all a, b and c
Our prelude A/T is very strong and hard to fail. The above symptoms usually indicate that either or both Solenoids (lockup and Shift) are not functioning as expected. Luckly, the solenoids are external and easy to remove, we can, at least easily, restore its functionality (in worst case, replace a new one, hopefully not).
This procedure is to help you just that.
0) Disconnect the battery -ve
1) Remove all air intake, etc. to clear the path for easy access to solenoid. Pic below is shown the solenoids which attached to the A/T box.
The top solenoid is the lockup control and the bottom one is the shift control solenoid.
2) Carefully unplug the wire connection from both solenoids by lifting the tap from the plug. Pic below shown two unplugs solenoid wire plugs
3) Remove three 10mm bolts from the lockup solenoid and remove the solenoid. It is a bit strong matting to the transmission housing, with just little force, it will be off from the housing. Here what it look like...
Closer, you can see the solenoid gasket filter attached to the solenoid. In my case, it has full of small metal on the filter, that block the passage of oil to the solenoid valve. At this point I go ahead and remove the remaining solenoid.
4) Carefully pry off the gasket filter from the solenoids. Here is my shift solenoid filter
Now we can start to do the fun stuff in order to restore the solenoid
5) If you want to reuse your gasket filter, then you need to clean the filter with brake cleanner, ensure the filter is clean. This allows oil passage to the solenoids.
After I clean the filter.
Now we turn to the solenoids themselve. The solenoid has two valves (A and B). Both need to activate (or click) when 12V signal apply to it. You can test this by apply a very short brief 12V +ve to one wire (either wire, one for each valve) and -ve to the body of the solenoid. Careful, not to let the +ve touch the -ve wire. In my case, I nearly did. With a full functional solenoid, you should hear a click or clicks. In my case, one valve is quite (stuck) and the other is very weak click. This indicated that my solenoid has stuck with all metall dust in it. and I need to clean the inside.
6) Let's start to clean the solenoid. First you can see the holes. Just blow the brake cleaner to each hole, you will see some metal dust coming out with the brake fluid.
But that alone is not enough, after you apply some brake cleaner, moderately tap it to a clean tow on the ground a few times. This will shake the dust inside the valve. Repeat the brake cleaner and tap..tap... during this time, you might see some metal dust seeping out of the hole.
7) Check the solenoid valve, by applying +ve and ground to solenoid body as above. You will hear the click is getting loder and kicking stronger. If not, repeat step 6 untill you see no more metal dust or you satisfy that both valves have strong and louder click. Now you know you have bring it back to life...
repeat the same procedure for the lockup control. Here are both of them and they are clean
8) Put the gasket filter back in
9) Apply some transimission oil to the gasket (a good excuse to check the fluid level by pull the yellow fluid level dipstick out ;) )
10) Clean the matting at the transmission house with clean rug and brake cleanner
11) Put back the lower solenoid first with three 10mm bolf and apply 12Nm (9lb) torque. I don't have much space for my bloody torque wrench so I guesstimate. Then the put back the top solenoid, similar to the bottom one.
12) Plug all the solenoid plugs back into car harness connection. Easy enough :)
13) put back the battery -ve and check everything around you, makesure no nut or nuts hanging around :)
Start the car and start to drive and enjoy a smoother shift and gear engaging......
That's all folks!!!!
Original Author: spacemaster


